

Our Ultimate FAQ
Search our help articles or browse by topic below.
General
How do I download a course certificate?
Downloading a course certificate from the Training Ninja website
1. Navigate to the www.trainingninja.co.za website.

2. Click on the “LOGIN” button in order to sign into your account.

3. Click on the “Username or Email Address” field and input your Username for your Training Ninja account.

4. Click on the “Password” field and input your Training Ninja password.

5. Click on the “Log In” button to sign into your account.

6. Locate and click on the “MY ACCOUNT” option to continue.

7. Training Ninja will redirect you to your “My Account” page where you will see a list of different Courses available and the Certificates for those completed courses. Click on one of the “Certificate” icons to download the Certificate for that completed course.

How do I find a course that I am enrolled for?
Locating your courses within the Training Ninja website
1. Navigate to the www.trainingninja.co.za website.

2. Click on the “LOGIN” button in order to sign into your account.

3. Click on the “Username or Email Address” field and input your Username for your Training Ninja account.

4. Click on the “Password” field and input your Training Ninja password.

5. Click on the “Log In” button to sign into your account.

6. Locate and click on the “MY ACCOUNT” option to continue.

7. Training Ninja will redirect you to your “My Account” page where you will see a list of different courses available for your account. Click on one of the courses in the list to continue.

8. Within the selected course you will be able to see the “Course Content”. Click on the “Getting to know the User Interface” button to proceed.

9. Congratulations you have successfully located your courses within the Training Ninja website. Click on the “Play” button to begin the course.

iSentry
How do I escalate iSentry Alerts?
Escalating iSentry Alerts to the Milestone Alarm Manager
1. Log into your Smart Client with your Milestone account.

2. Select the “iSentry Alerts” tab to continue.

3. Above you will see the different camera’s you have iSentry Alerts set up for.

4. Select one of the cameras in the list to view the alerts triggered for that camera.
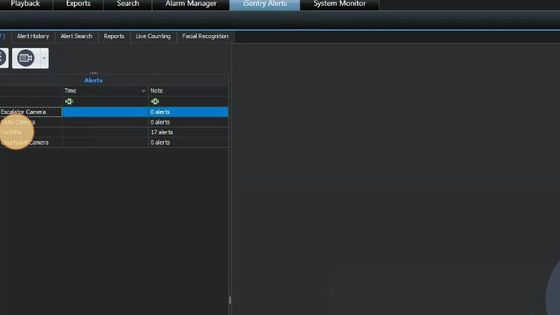
5. Previews will be displayed for each Alert that was triggered.
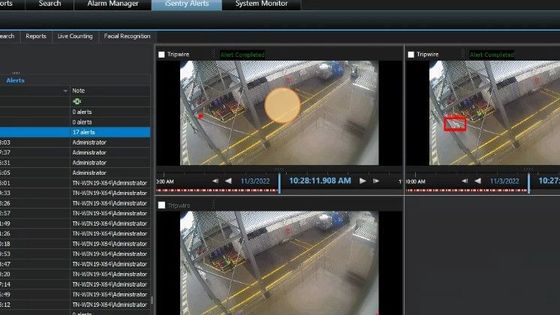
6. Select the checkbox for one of the previews of a triggered alert.

7. Locate and click on the “Escalate to Alarm” button found at the bottom of the screen.
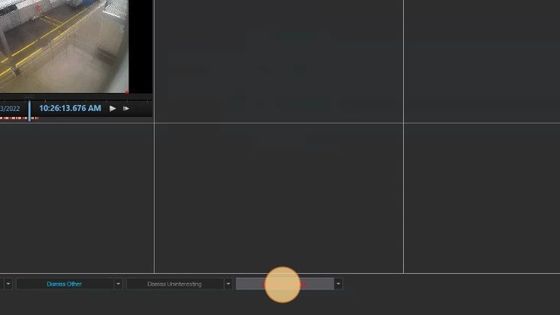
8. You need to set the “Alarm Classification” first. This determines how the Alarm will be grouped. Locate and click on the “Suspicious Suspect” to continue.
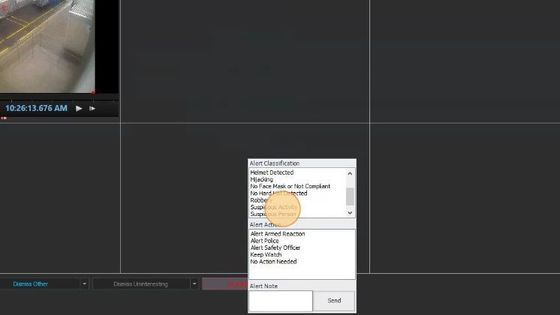
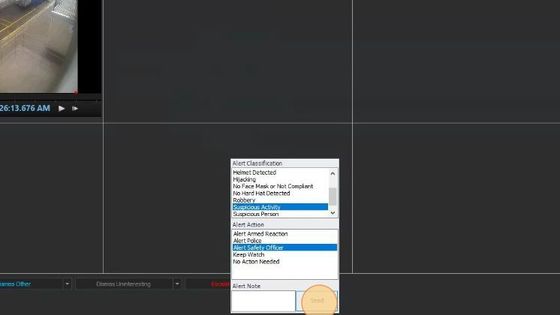
9. Once the “Alarm Classification” has been set, you need to determine the action that needs to be taken. Locate and click on the “Alert Safety Officer” option to escalate the alert to a supervisor.
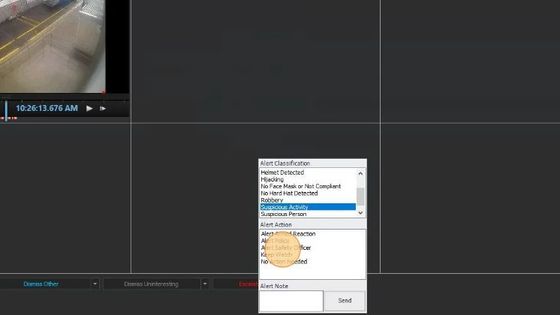
10. Click on the “Send” button to finish sending the alert through to the “Alarm Manager”.
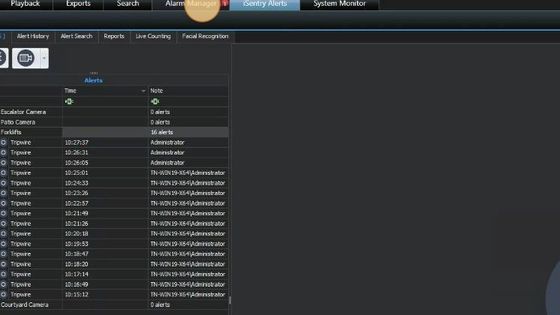
11. Notice the “Alarm Manager” tab has a red one next to it. This indicates one new alarm. Click on the “Alarm Manager” tab to continue.
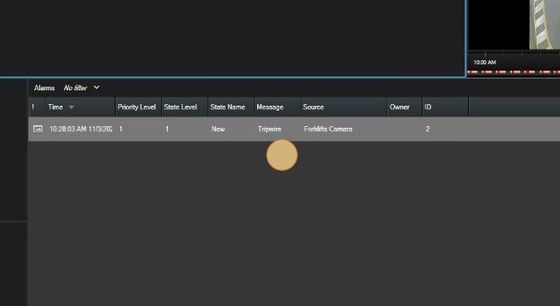
12. In the “Alarm Manager” tab you will see your recently escalated alarm. Congratulations you have successfully escalated an alert to the Milestone Alarm Manager.
How do I bookmark iSentry Alerts?
How to Bookmark iSentry Alerts
1. Log into your Smart Client with your Milestone account.
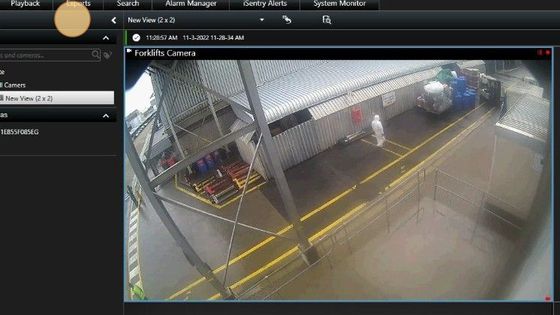
2. Select the “iSentry Alerts” tab to continue.
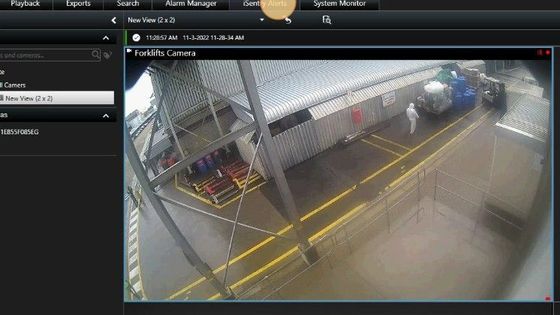
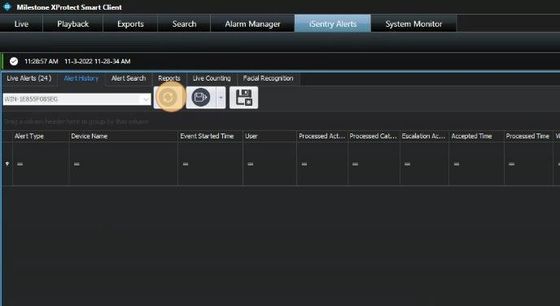
3. Locate and click on the “Alert History” button to view all the previous alerts.

4. In some scenarios you may be required to export footage from a previous alert. With your current server selected, locate and click on the “Refresh” button to load previous alerts.
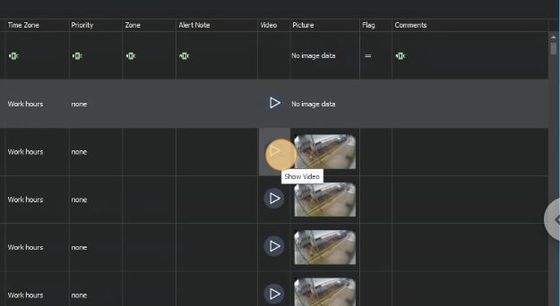
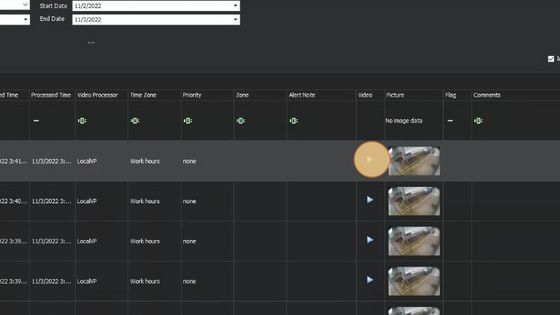
5. The table is now populated with previous alerts. Locate and click on the “Play” button for one of the alerts to view it’s video footage.
6. In the event you need to bookmark a triggered alert for later viewing, locate and select the “Bookmark” button found in the upper-right hand side of the popup window.
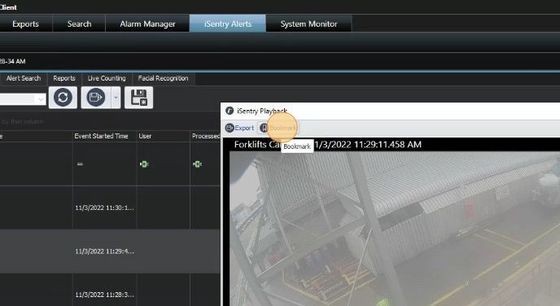
7. It is always good to give your bookmark a title so that you may find it easily later on.
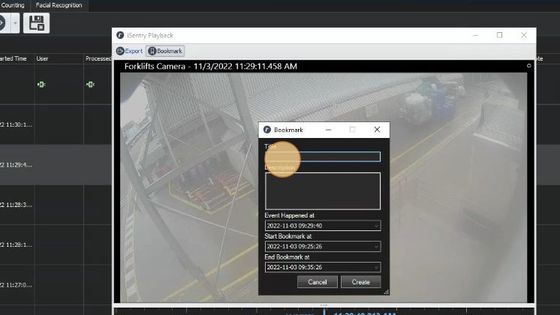
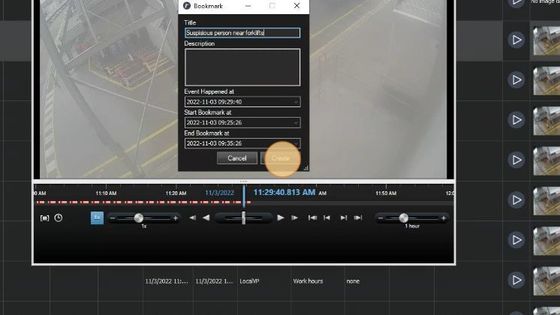
8. Click on the “Create” button to create the bookmark.
9. Locate and click on the grey cross to close the playback window.
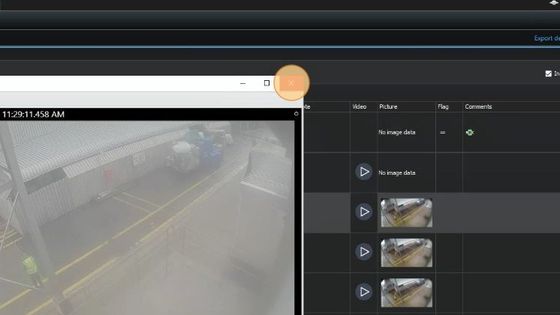
10. Congratulations you have successfully created a bookmark for a triggered alert.

How do I filter iSentry Alerts?
Filtering for iSentry Alerts
1. Log into your Smart Client with your Milestone account.

2. Select the “iSentry Alerts” tab to continue.
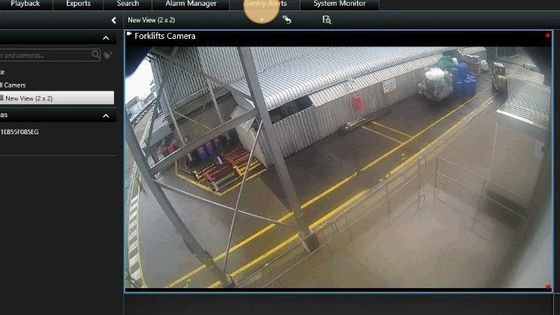
3. Locate and click on the “Alert Search” tab.
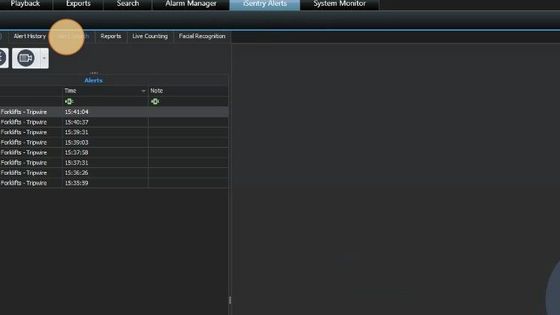
4. The “Alert Search” tab can be used to search for specific alerts on specific devices at a specific time. Locate and click on the “Device” dropdown box.
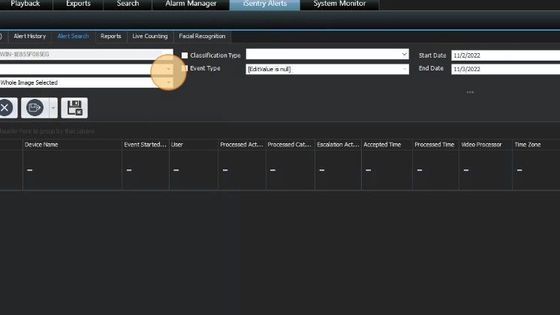
5. From the list of devices, select the “Forklifts” device.

6. Locate and click on the “Event Type” checkbox to enable the event search.

7. With the “Event Type” enabled, click on the dropdown box next to it to select an event.
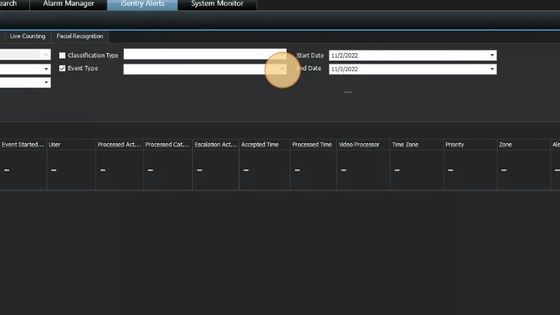
8. Select the specific event that you are searching for. In this case we are looking for a “Tripwire” event.
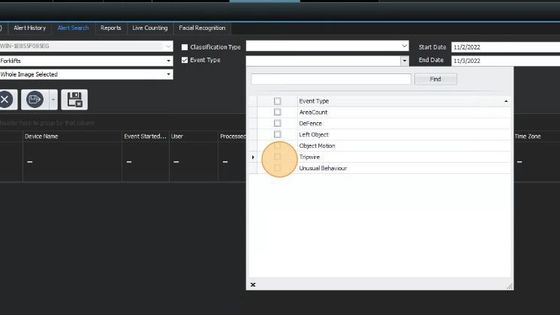
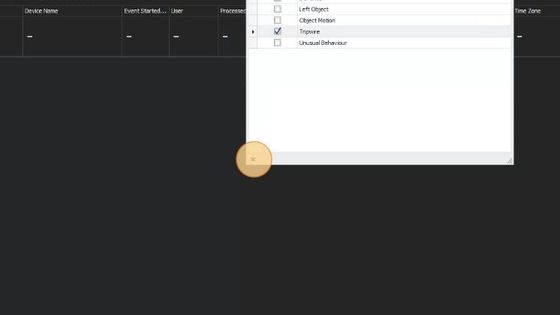
9. Locate and click on the black cross below to close the event types popup.
10. You are able to specify the dates of when an alert was triggered.
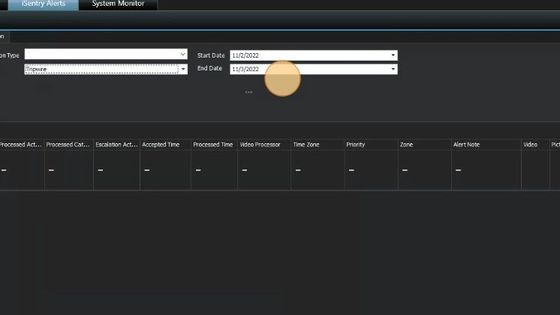
11. Locate and click on the magnifying glass icon to search for alerts matching your defined criteria.
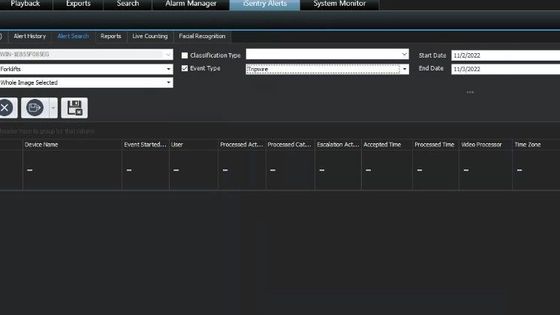
12. The results appear in the table below. Each alert is accompanied by an image as well as the footage from the time of the alert. Congratulations you have successfully filtered for alerts using the iSentry Alerts tab.
How do I find the iSentry Alert Search tab?
Locating the Alert Search tab for iSentry
1. Log into your Smart Client with your Milestone account.
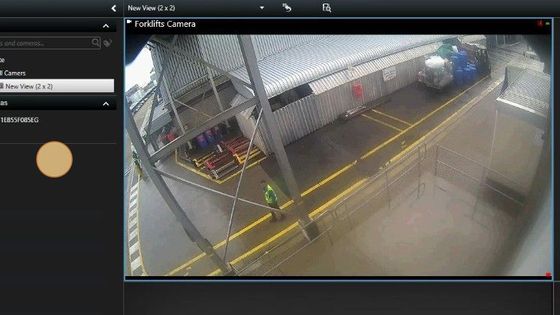
2. Select the “iSentry Alerts” tab to continue.
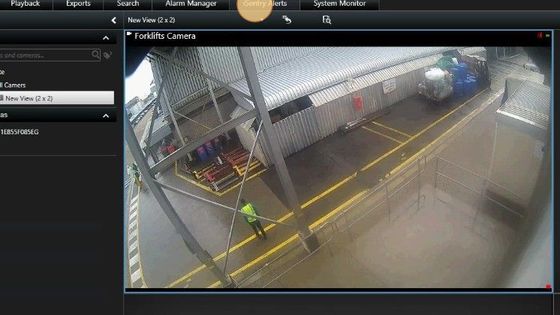
3. Inside the iSentry Alerts tab you will see all the alerts triggered within your system.
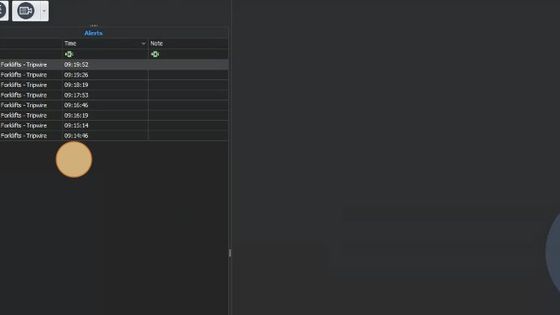
4. Locate and click on the “Alert Search” tab to continue.
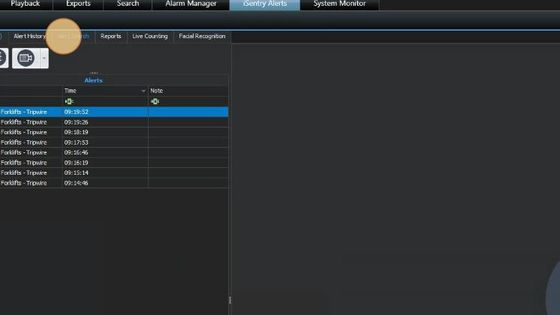
5. The “Alert Search” tab allows you to search for specific alerts that have occurred. Using the fields above you can specify the server, device, search area, start time and end time of the alert you are searching for.
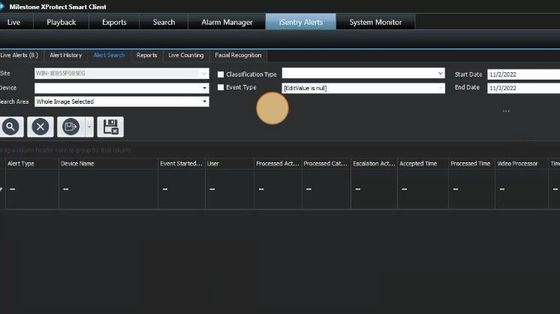
6. Congratulations you have successfully located the “Alert Search” tab within the iSentry Alerts.

How do I playback iSentry Alert footage?
How to export and playback footage relating to iSentry Alerts
1. Log into your Smart Client with your Milestone account.

2. Select the “iSentry Alerts” tab to continue.
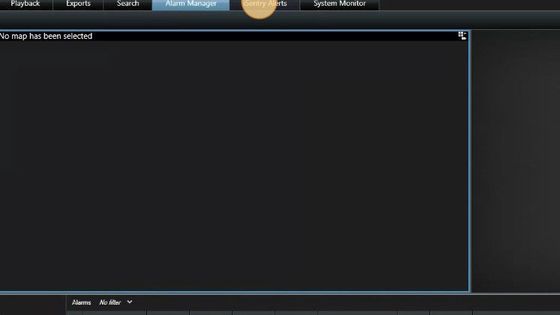
3. Locate and click on the “Alert History” button to view all the previous alerts.
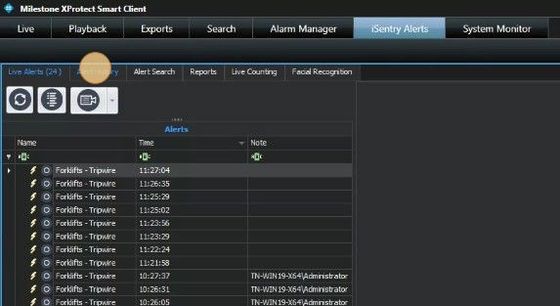
4. In some scenarios you may be required to export footage from a previous alert. With your current server selected, locate and click on the “Refresh” button to load previous alerts.
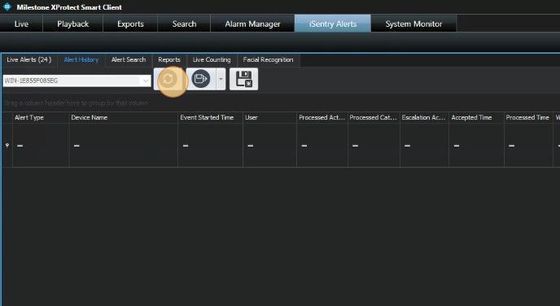
5. The table is now populated with previous alerts. Locate and click on the “Play” button for one of the alerts to view it’s video footage.
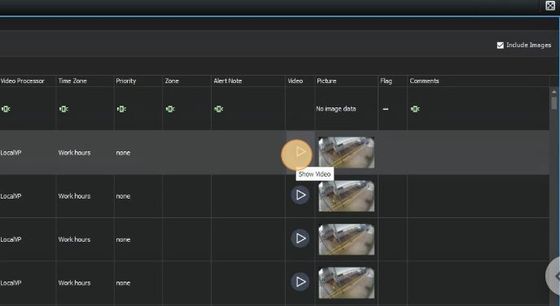
6. You may view the video footage of what caused the alert by clicking on the play button at the bottom of the popup window.
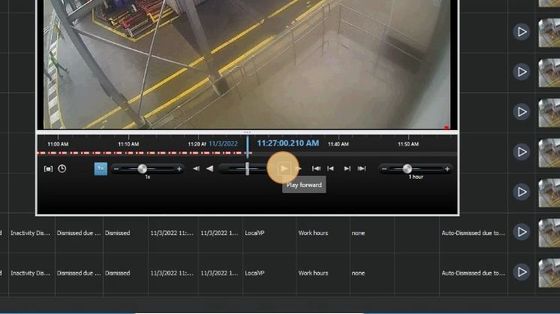
7. In the event you need to export the video footage for further use, click on the “Export” button found in the upper-right hand side of the popup window.
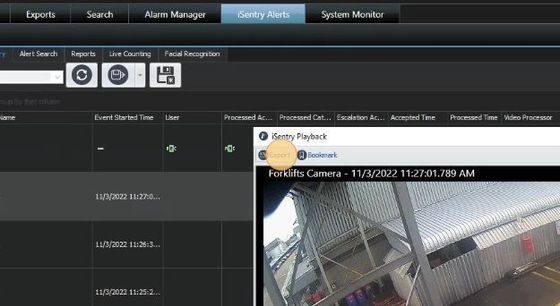
8. When exporting the footage, you can change the name, export location and format of the footage. Select the “AVI Format” option to continue.
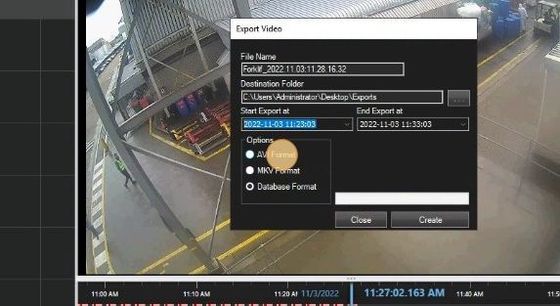
9. With the format changed, locate and click on the “Create” button to export the footage.
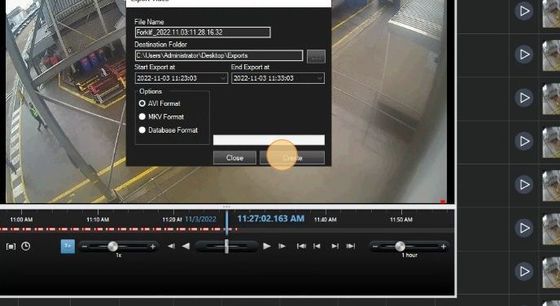
10. A message informs you that the export has been successful.
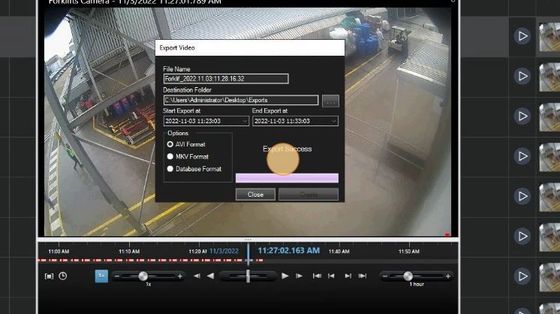
11. Locate and click on the close button to close the export window.

12. Locate and click on the grey cross to close the playback window.
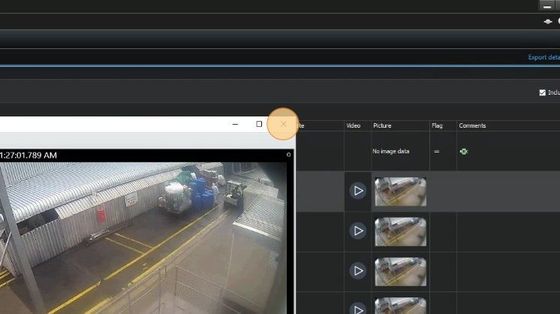
13. Congratulations you have successfully exported and viewed a triggered alert’s video footage.
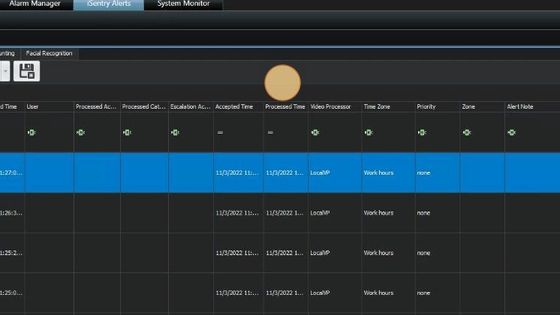
How do I deal with iSentry Alerts in the Milestone Alarm Manager?
How to deal with an iSentry alert in the Milestone Alarm Manager
1. Log into your Smart Client with your Milestone account.
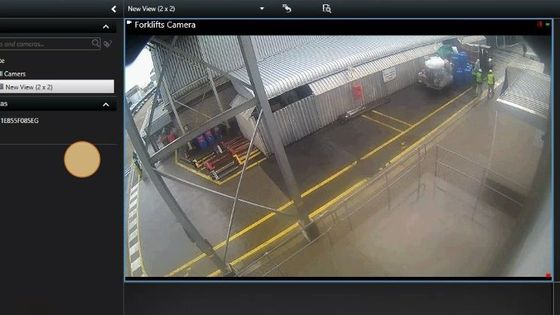
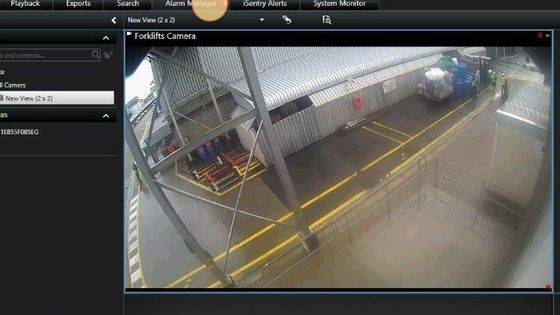
2. Select the “Alarm Manager” tab to continue to deal with your escalated alarms.
3. Alarms are displayed via a table view and can be classified according to one of the four quick filters.
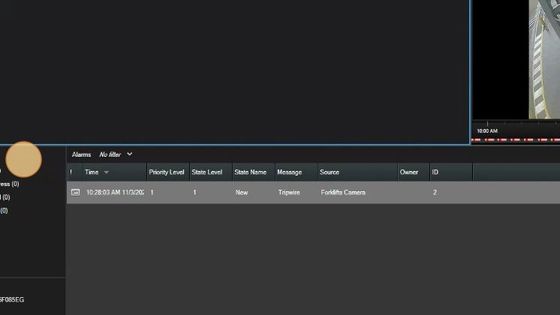
4. Locate and double-click on your escalated alarm within the table.
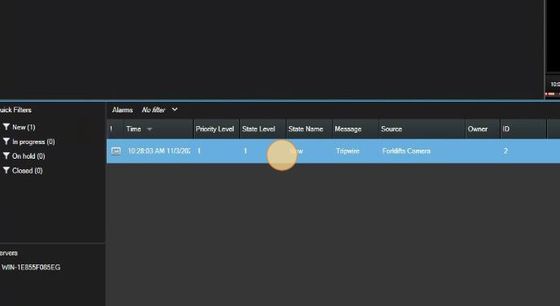
5. This is the alert you previously escalated. This alarm needs to be assigned to the administrator and it needs to be changed to a “In progress” state. Locate and click on the “Assigned to” dropdown box.
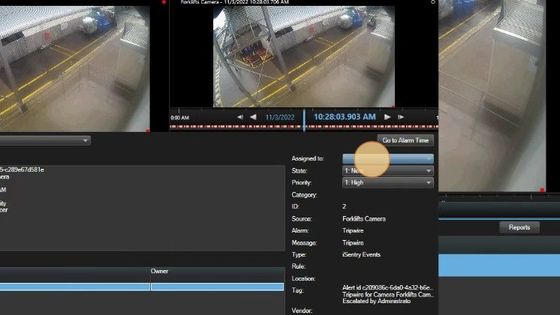
6. Select the “Administrator” user from the dropdown options.
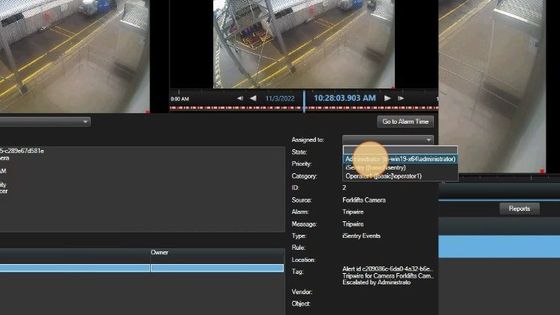
7. Locate and click on the “State” dropdown box to continue.
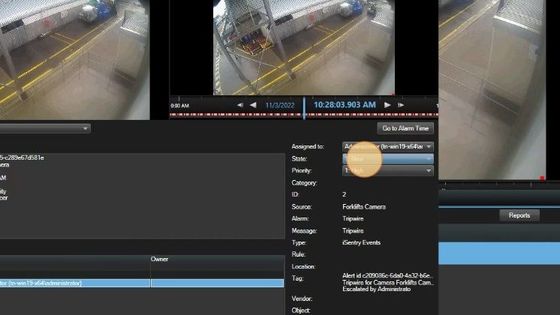
8. Select the “In progress” state from the dropdown options.
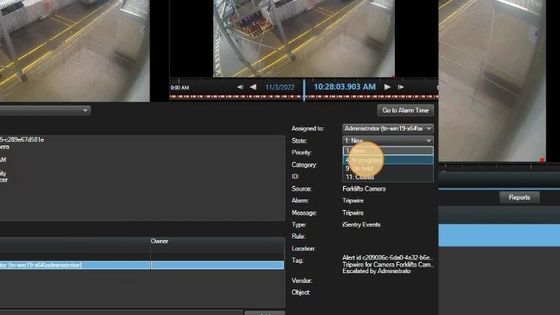
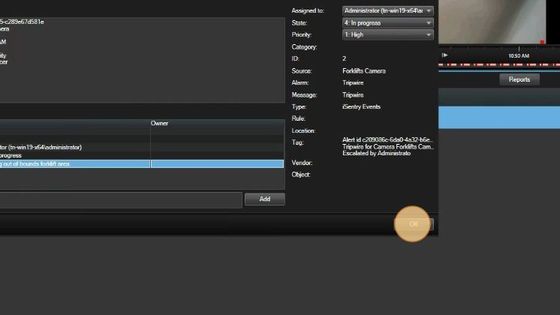
9. You need to add some additional information about the alarm. Locate and click on the text box below the “Activities” window.
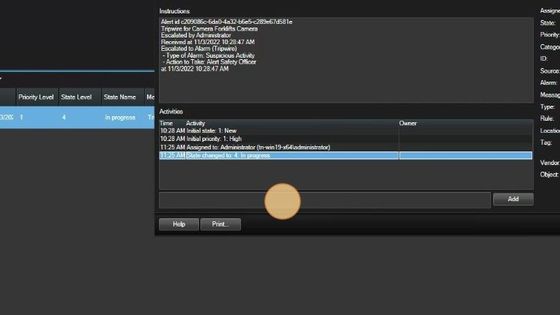
10. Enter “Unknown person entering out of bounds area” into the text box to continue.
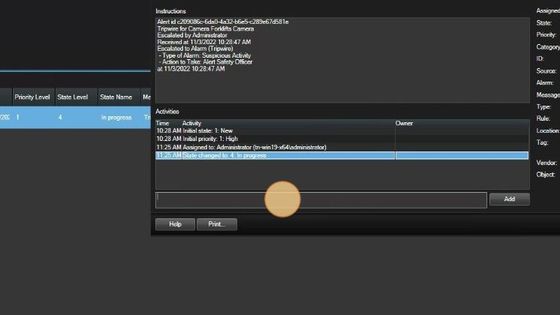
11. Click on the “Add” button to add your information to the alarm.
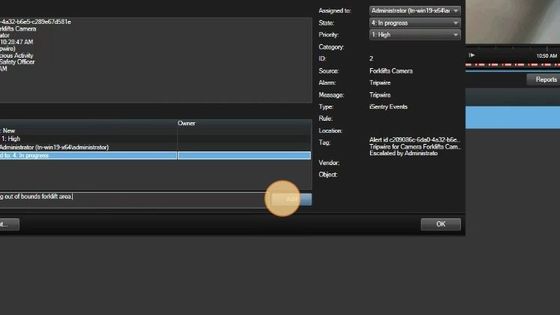
12. Save your changes by clicking on the “OK” button to close the popup window.
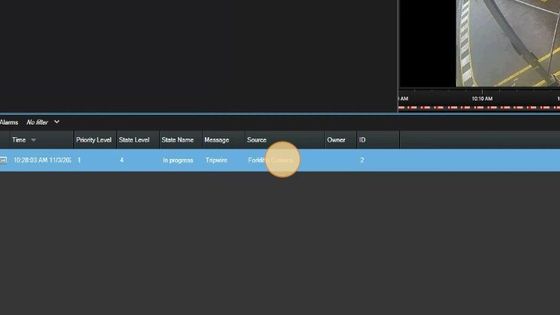
13. Once an alarm has been dealt with, you can go ahead and change the state to closed. This is done by right- clicking on the alarm.
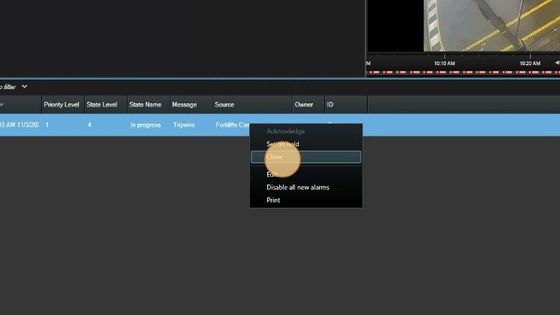
14. Select the “Close” option to change the state of the alarm to closed.
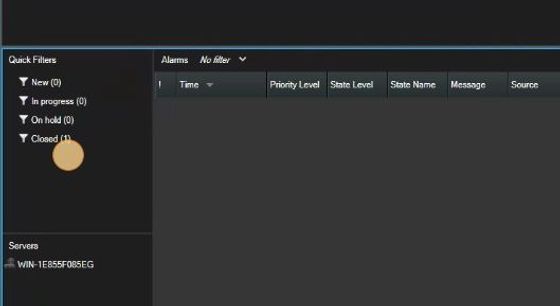
15. The alarm has now been moved from the “In progress” state to the “Closed” state. Congratulations you have successfully dealt with an escalated alert.
Milestone Rapid Review
How do I use Rapid Review?
Rapid Review features
1. Locate and double-click on the “Smart Client” icon on the desktop to open the client.

2. Input your username and password for your Milestone account and click on the “Connect” button to sign into the Smart Client.
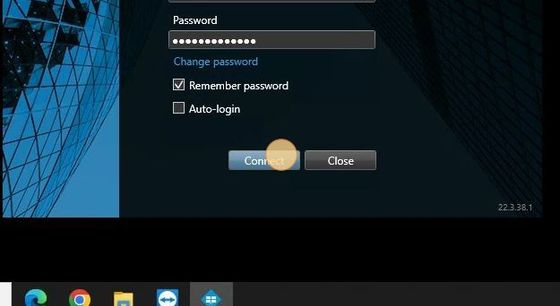
3. Ensure you are on the “BriefCam” tab before continuing. Click on one of the Cases you have created to continue.
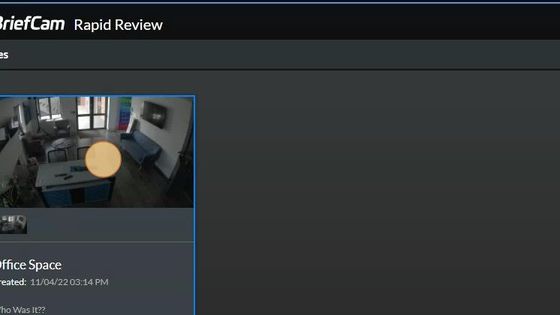
4. Click on the “Visual Layers” icon to view additional features that comes with “BriefCam”.
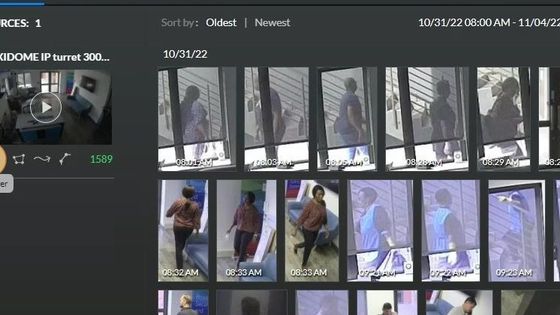
5. Select the “Activity” icon to continue.
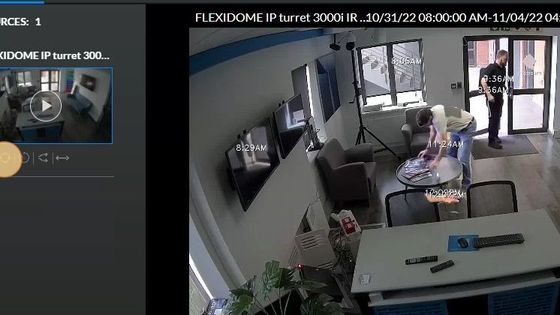
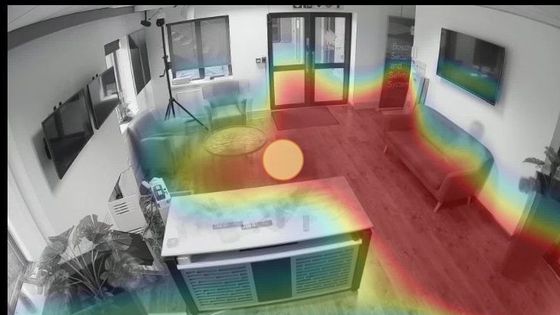
6. The “Activity” heat map shows customer traffic patterns, giving you insights for using space. Perhaps you need to place or move certain objects. The color code at the top of the screen indicates the number of people who have been through the area.
7. Select the “Dwell” icon to continue.
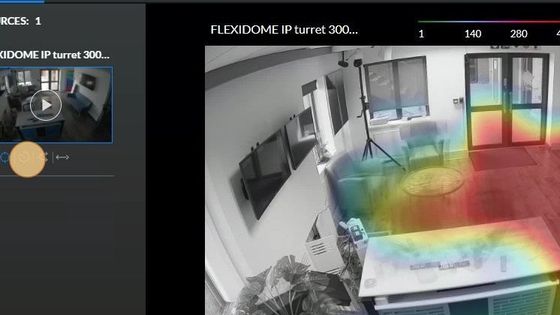
8. From the “Dwell” heat map, you see where people are stopping and spending most of their time. This can be used for sales and promotions or to measure loitering.
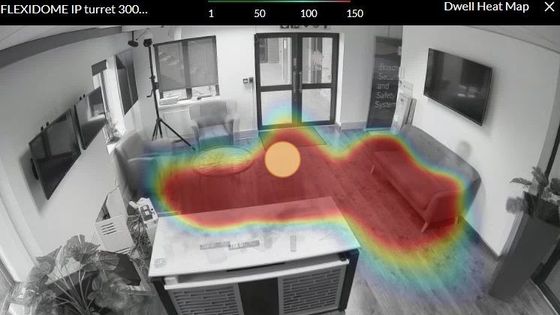
9. Select the “Path” icon to continue.
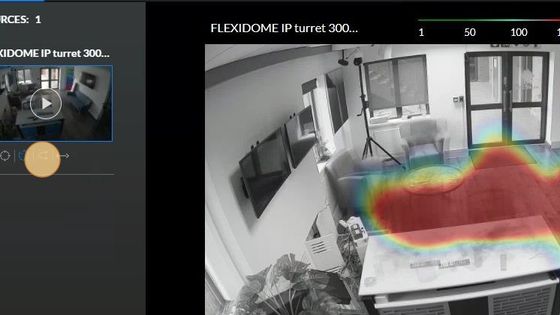
10. Color coded paths show you common traffic patterns. Red is the most frequent path that is taken.
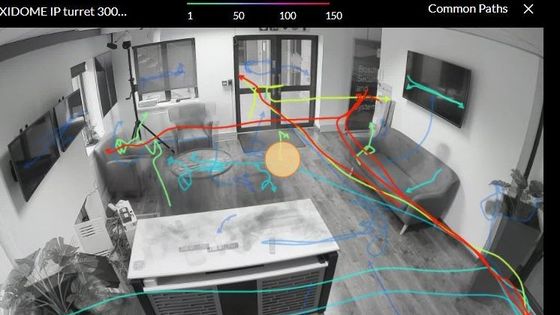
11. Select the “Background Changes” icon to continue.
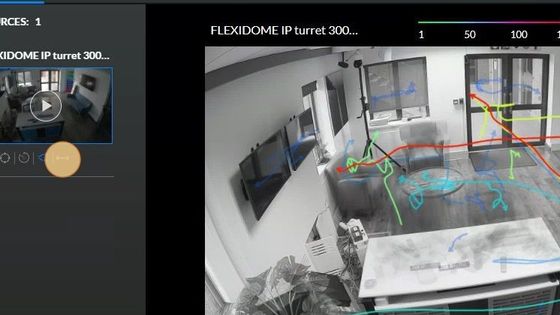
12. “Background Changes” are items that have changed placement. For example these are objects that have been picked up or slightly moved.
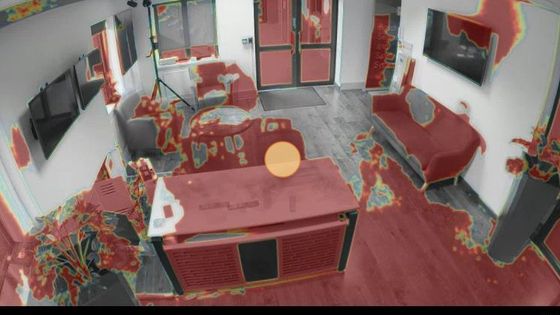
13. Click on the “Visual Layer” icon to view the original icons of the “BriefCam” tab.
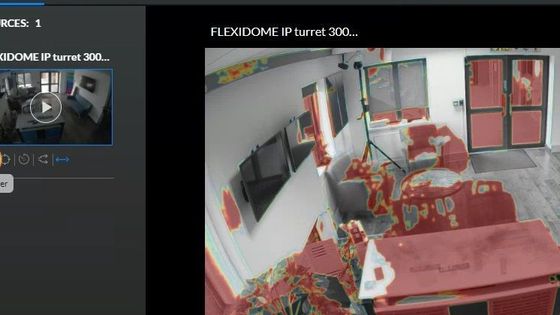
14. Click on the “Area” icon to continue.
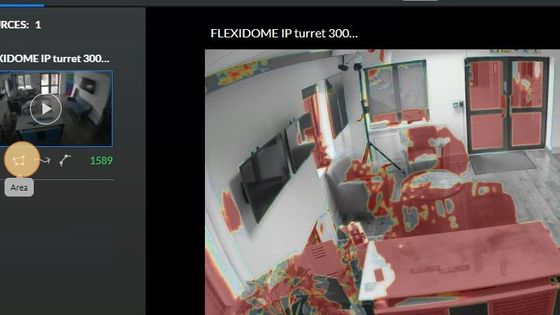
15. Draw a shape using the “Area” feature to filter out a location on video footage. This will filter for every person that went into this area.
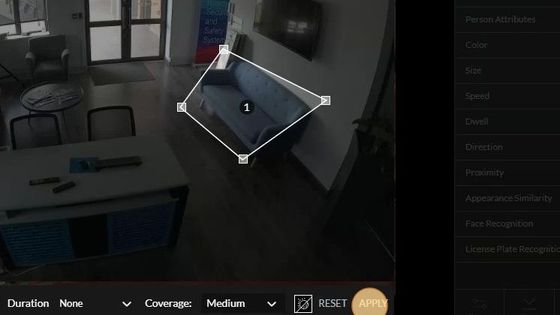
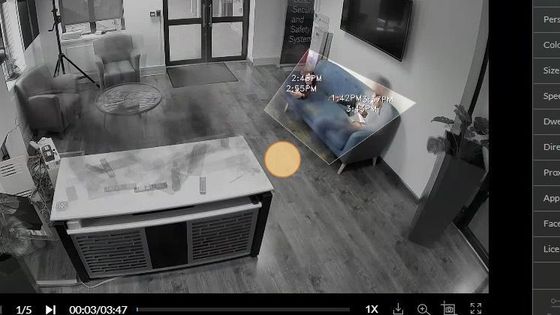
16. In the matter of seconds Rapid Review will identify individuals who enter the area that has been drawn.
17. Click on the “Path” icon to continue.
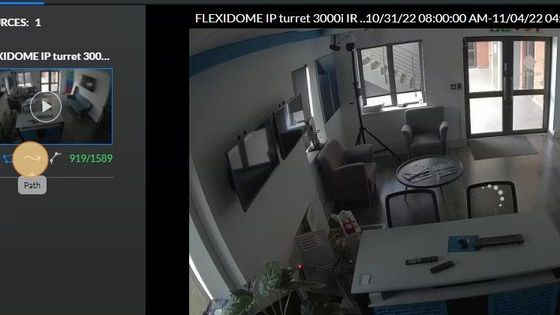
18. Draw a path of your choosing and select “Apply” to confirm the chosen path.
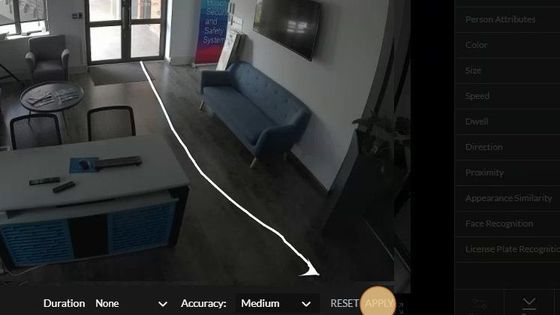
19. Rapid Review will filter out individuals following that specified path.

20. Select the “Line Crossing” icon to continue.
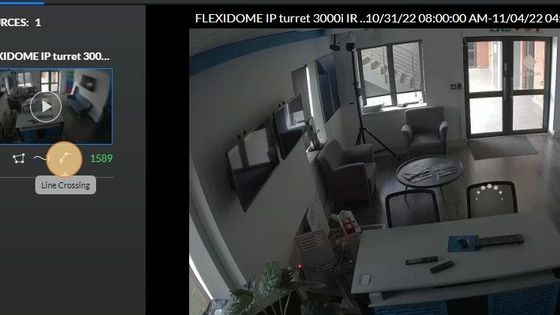
21. Draw a line using the “Line Crossing” feature and select the “Apply” button to confirm your chosen location.
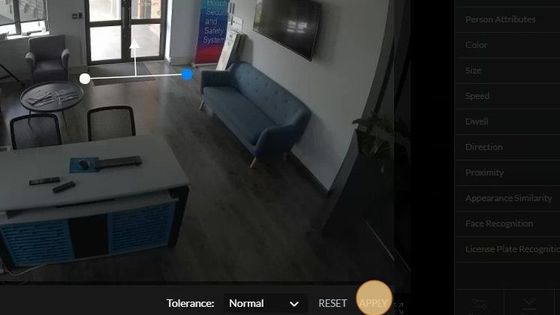
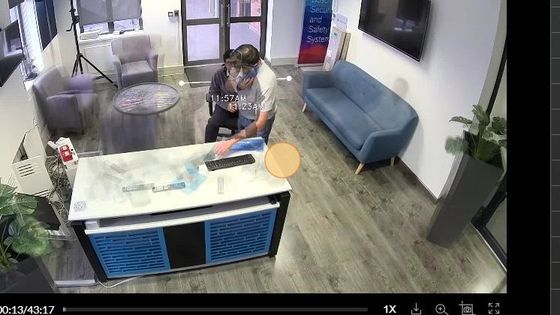
22. Now you are able to see every individual who crosses that “Line Crossing”. Congratulations you have successfully explored the Rapid Review features in the “BriefCam” tab.
Rapid Review quick filters
Rapid Review quick filters
1. Locate and double-click on the “Smart Client” icon on the desktop to open the client.

2. Input your username and password for your Milestone account and click on the “Connect” button to sign into the Smart Client.
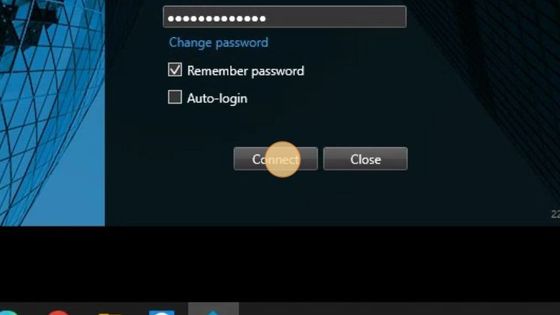
3. Input your username and password for your Milestone account and click on the “Connect” button to sign into the Smart Client.
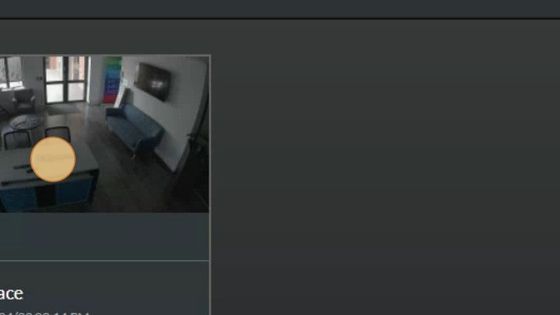
4. Once you have selected a case you will see a list of quick filters on the right-hand side of the screen. Click on the “Source” quick filter to continue.
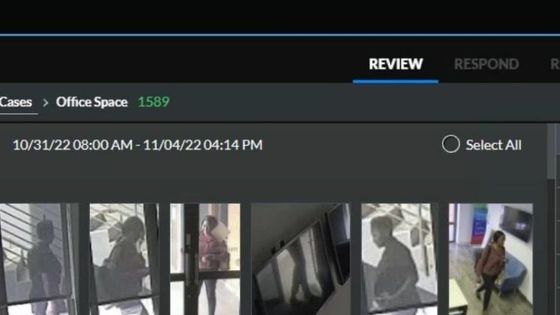
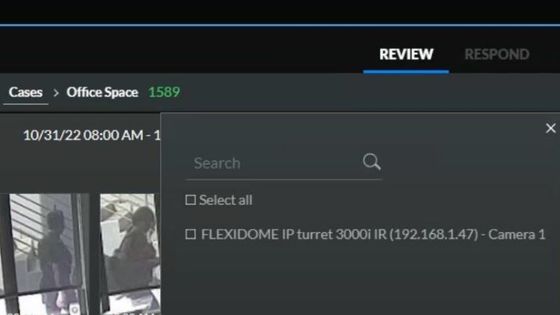
5. The “Source” quick filter will allow you to limit analysis to specific cameras. Click on the “Time Range” quick filter to continue.
6. The “Time Range” quick filter allows you to limit the search to specific time ranges. You can enter time numerically or drag the triangle icon up or down. Click on the “Class” quick filter to continue.
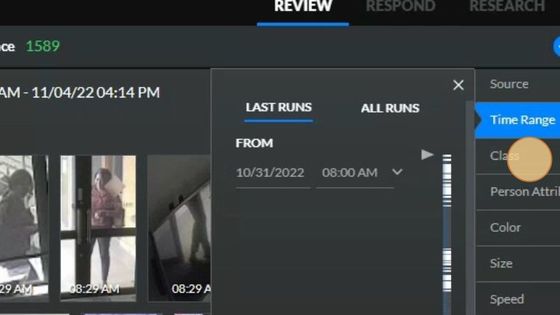
7. The “Class” quick filter allows you to identify objects as People, 2-Wheeled Vehicles, or other Vehicles such as Cars, Pickup, Vans, Trucks, Buses, and Trains. Click on the “Person Attributes” quick filter to continue.
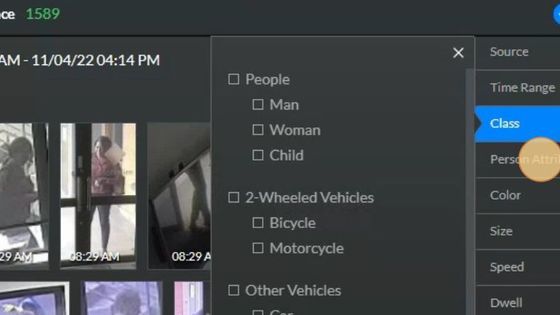
8. The “Person Attributes” allows you to identify people based on Clothing, Hats, Bags, and Masks. Click on the “Color” quick filter to continue.
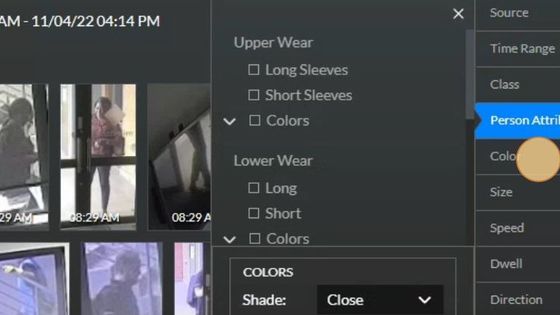
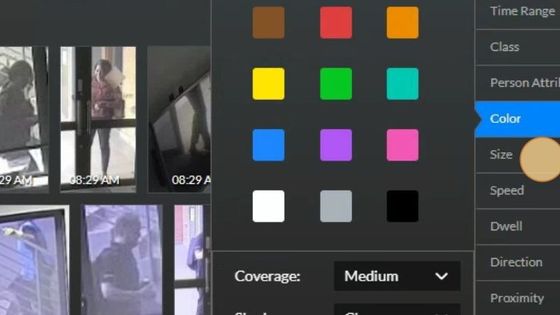
9. The “Color” quick filter allows you to identify objects based on any combination, shades, and tints of several colors. Click on the “Size” quick filter to continue.
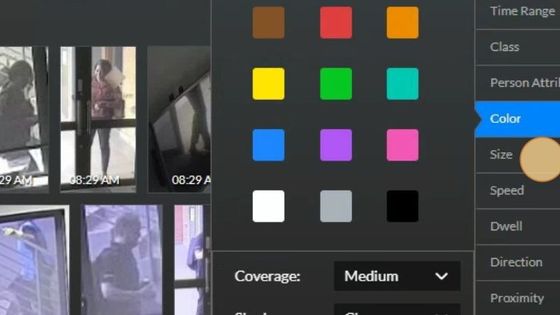
10. The “Size” quick filter allows you to select objects based on their actual (real-life) size from a histogram of sizes relevant to a specific case. Click on the “Speed” quick filter to continue.
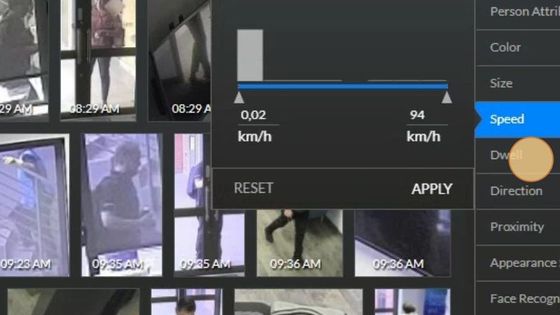
11. The “Speed” quick filter allows you to select objects based on their actual speed shown in the histogram of speeds relevant to a specific case. Click on the “Dwell” quick filter to continue.
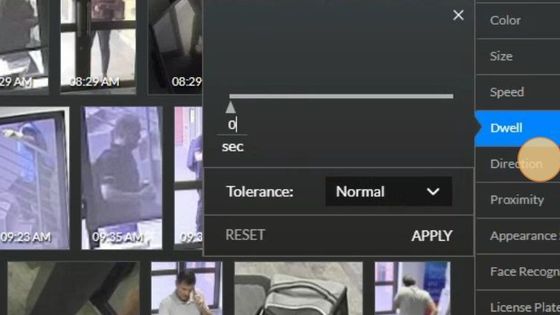
12. The “Dwell” quick filter allows you to select objects dwelling in a location for longer than a user-specified period of time. Click on the “Direction” quick filter to continue.
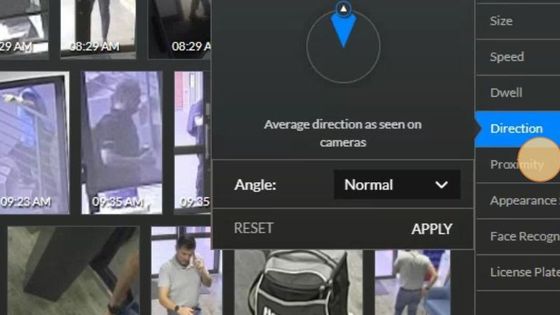
13. The “Direction” quick filter allows you to select objects according to their direction as seen in the video. Click on the “Proximity” quick filter to continue.
14. The “Proximity” quick filter allows you to identify people who have had close contact with other individuals. You can use this for contact tracing. Click on the “Appearance Similarity” quick filter to continue.
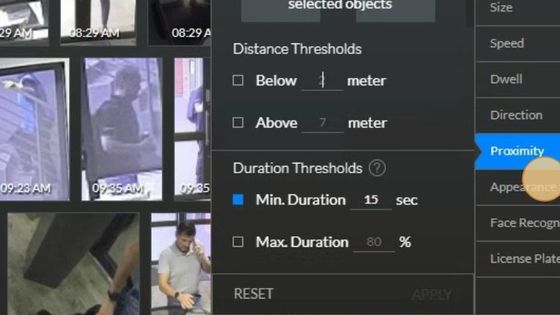
15. The “Appearance Similarity” quick filter allows you to identify people and vehicles with similar attributes. Click on the “Face Recognition” quick filter to continue.
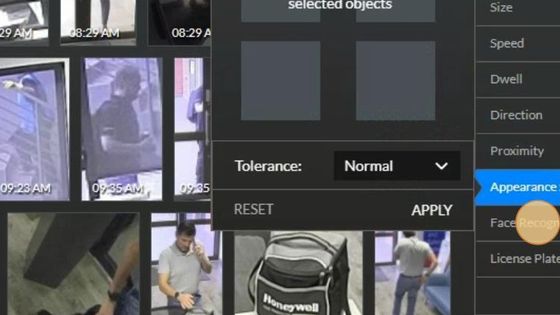
16. The “Face Recognition” quick filter allows you to view all faces in a case, or search by facial recognition via an external image, or watchlist. “Face Recognition” can be disabled by VMS administrators. Click on the “License Plate Recognition” quick filter to continue.
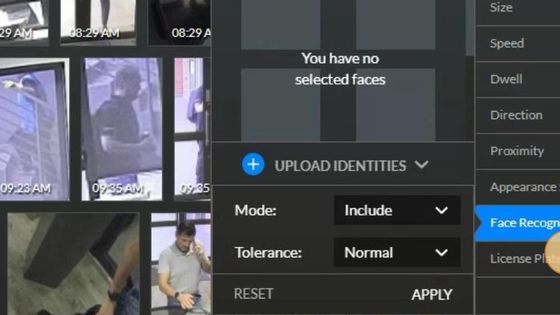
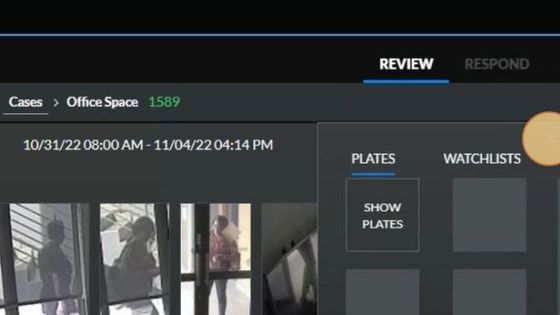
17. The “License Plate Recognition” quick filter allows you to extract a vehicle’s license plate number from a surveillance video and transform it into a textual searchable string. Congratulations you have successfully navigated the “BriefCam” quick filters.
How do I create a Rapid Review case?
Creating a Case within Rapid Review
1. Locate and double-click on the “Smart Client” icon on the desktop to open the client.

2. Input your username and password for your Milestone account and click on the “Connect” button to sign into the Smart Client.
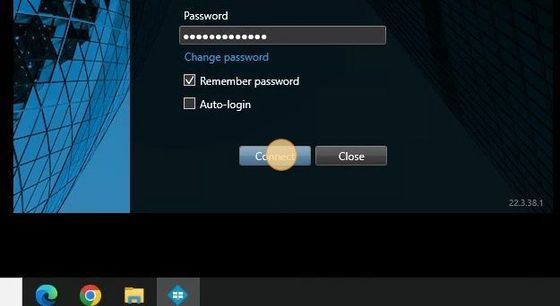
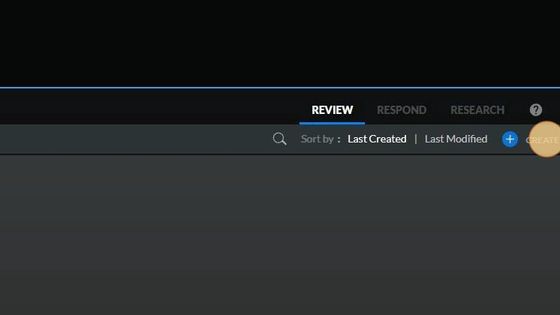
3. Click on the “Create Case” button to create a new case.
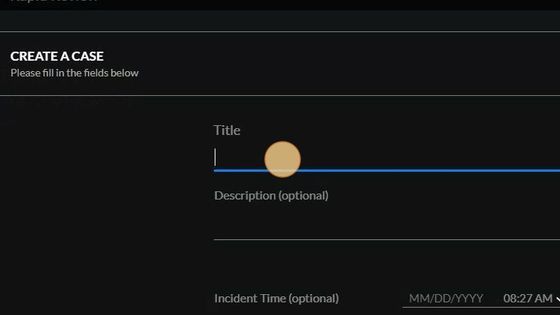
4. Select the “Title” field and enter a title for your new case.
5. Click on the “Create” button to continue.
6. You have to “Add Video” to your newly created case in order to pull video footage into Rapid Review. Click on the “Add Video” button to continue.
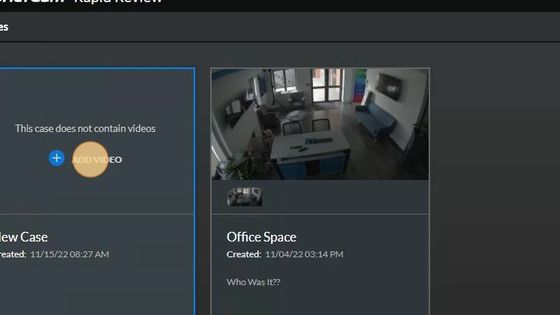
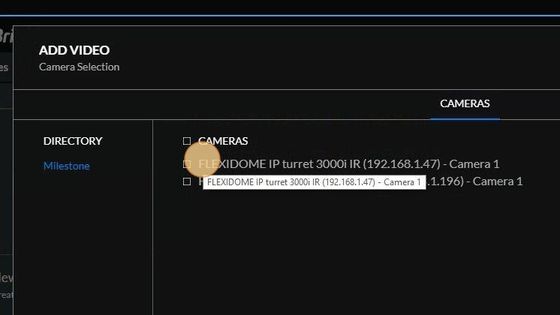
7. You see the cameras activated for Rapid Review, select a camera in the list to view it’s video footage.
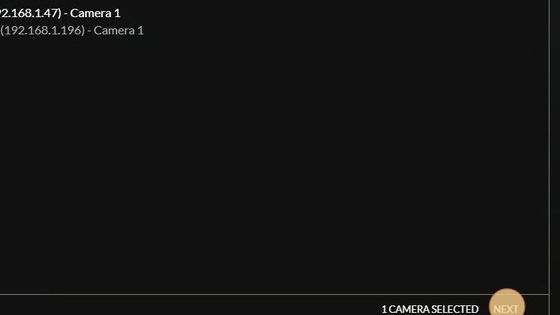
8. Click on the “Next” button to continue to the next step.
9. You can adjust the start and end time for the amount of video you want to analyze. More video requires more server resources and will take longer to analyze.
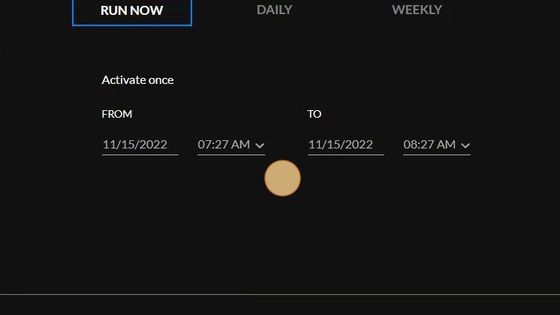
10. Once you have specified the start and end time of the video footage you want to analyze, click on the “Submit” button to continue.
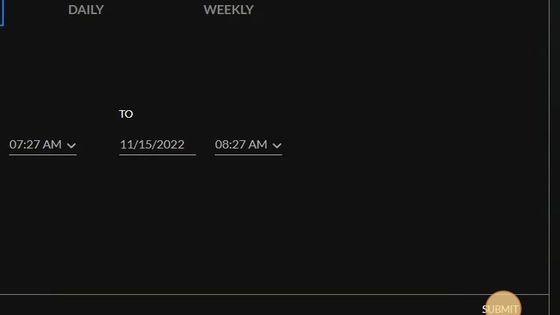
11. The processing icon will spin as it analyses the video. Processing time will depend on the amount and resolution of the video you are analyzing. Once it completes, click on the newly created case.
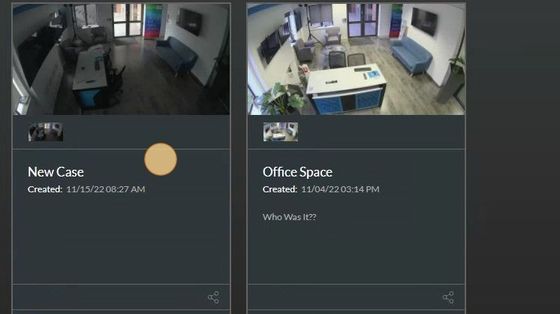
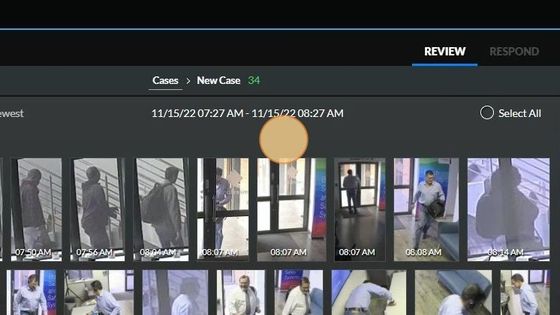
12. The case opens with every object Rapid Review identified and isolated. Congratulations you have successfully created a new case with Rapid Review.
How do I export Rapid Review footage?
Exporting video footage with Rapid Review
1. Locate and double-click on the “Smart Client” icon on the desktop to open the client.

2. Input your username and password for your Milestone account and click on the “Connect” button to sign into the Smart Client.
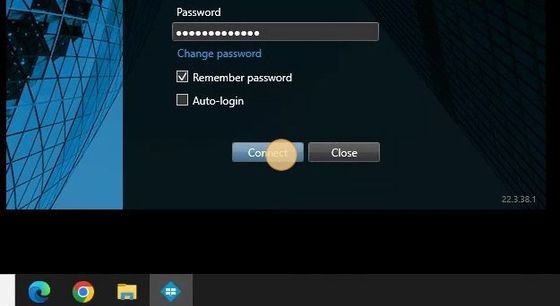
3. Ensure you have selected the “BriefCam” tab before continuing. Select a case you have created in order to view the video footage for that case.
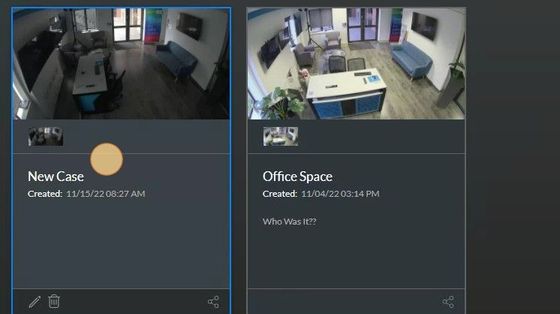
4. Click on the “Play” icon to continue.
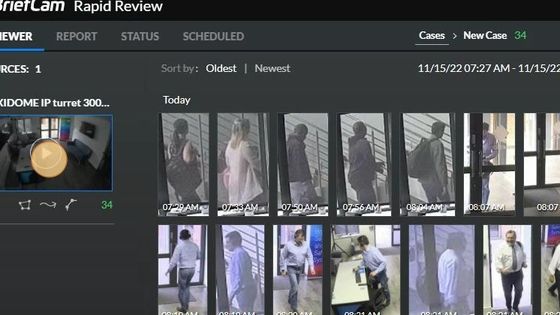
5. Rapid Review time stamps events. Select an event to view it’s details.
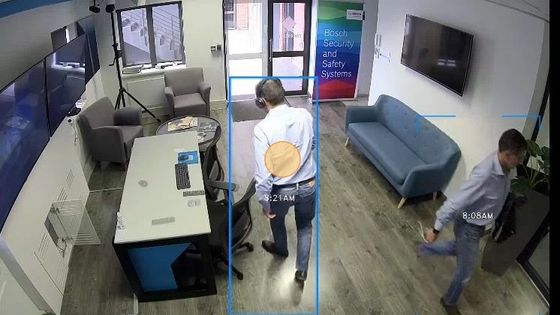
6. From here, you can see the Original Video, Add to a Report, Add to Face Recognition list if enabled by the administrator, find similar people, check proximity for contact tracing or Download Clip.
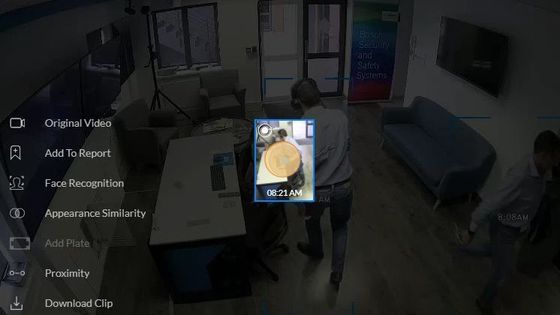
7. Click on the “Export” button to export this video footage.
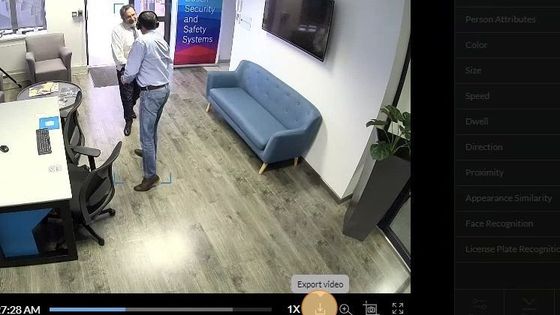
8. A pop-up appears asking where you would like to export the video footage to. For the purposes of this training manual we will be exporting the footage to the “Documents” location.
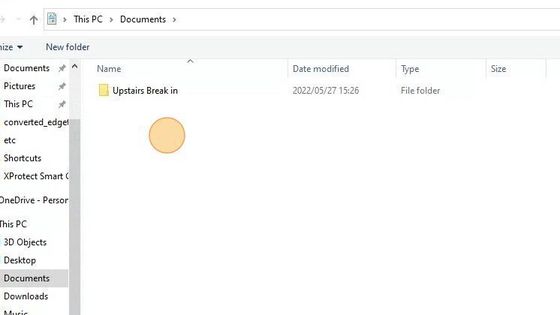
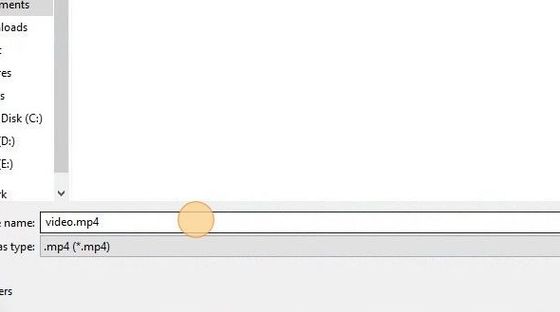
9. It is recommended to enter a “File Name” for the video footage in order to make it easier to find later.
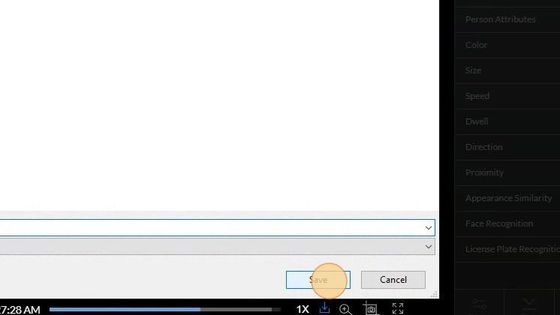
10. Click on the “Save” button to confirm the save location of the exported video file.
11. Verify that your video footage was exported to the specified location. Locate and click on your “File Explorer”.
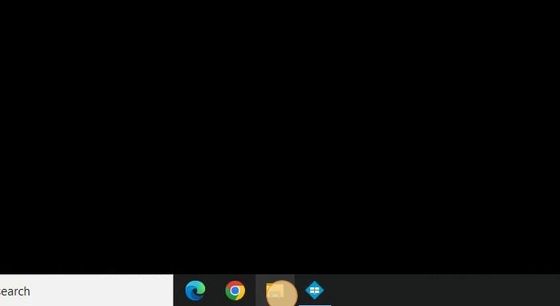
12. Select the “Documents” option to continue.
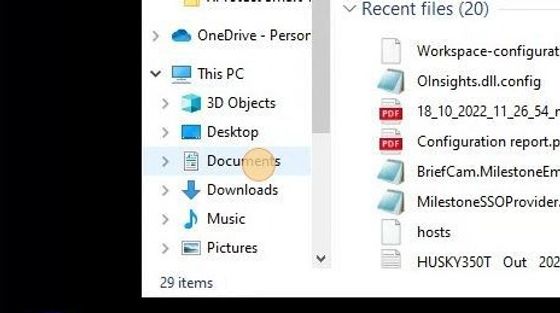
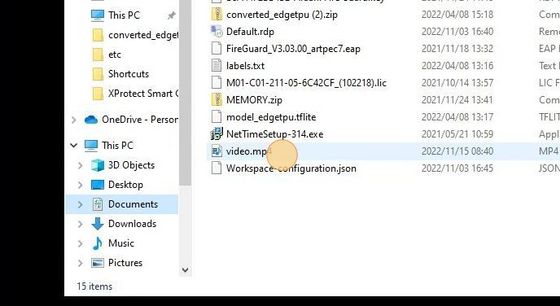
13. In the “Documents” folder we can see the exported video file. Congratulations you have successfully exported video footage using Rapid Review.
XProtect Milestone
How do I create a My Milestone account?
Logging into My Milestone without a Milestone account
1. Navigate to the milestonesys.com website.

2. Click on the “LOG IN” button to continue.

3. From the dropdown select the “My Milestone” option.

4. If you do not have a Milestone account, click on the “Create one now” button written in blue text to continue.

5. Milestone requires it’s users to input information about themselves in order to setup a Milestone account. Click on the “Company” field and enter the name of the company you are currently working for.

6. Click the “Zip/Postal Code” field and enter the Postal code of the area you are currently living in.

7. Click on the “Country or Region” field and select the Country or Region from the dropdown that you are currently living in.

8. The D-U-N-S Number is a unique nine-digit number that identifies business entities on a location-specific basis. Click the “D-U-N-S Number” field and enter your D-U-N-S Number for your company. If you are unaware of what your companies D-U-N-S Number is then you may leave this field blank.

9. Click the “Company email” field and enter your Company email to continue.

10. Milestone requires you to check the “I’m not a robot” checkbox. Check this box now in order to proceed.

11. Click on the “NEXT” to continue to the next page.

12. If you were unaware of your D-U-N-S Number then Milestone will search for your company. Select one of the options below which best matches your company’s description.

13. Click on the “NEXT” button to continue.

14. Milestone requires it’s users to enter additional information before they can assign you with a Milestone account. Click on the “Email” field and enter your email to continue.

15. Click on the “First Name ” field and enter your First Name in order to continue.

16. Enter your Last name inside the “Last Name” field to continue.

17. Click on the “Code” dropdown arrow and select one of the cellphone codes which is represented for your country or region.

18. Click the “Telephone” field and enter your Telephone number to continue.

19. Enter your Job Title inside the “Job Title” field to continue.

20. Click on the “Create Password” field and input a unique password for your Milestone account.

21. Click the “Confirm Password” field enter the newly created password as a confirmation.

22. Click on the “Yes I agree to the Terms ans Conditions” checkbox to let Milestone know that you agree to their terms and conditions.

23. Click on the “Yes, I would like to receive marketing communication by electronic mail, and calls from Milestone Group Companies” checkbox if you wish to receive new information about Milestone products, services and activities.

24. Click on the “NEXT” to proceed to the last step.

25. Click on the “SIGN UP” button to finish the process and send your information through to Milestone.

26. You have now created a Milestone account. Input your new Milestone account details in the “Log In” section to enter your “My Milestone”.

27. To enter your “My Milestone” Portal, select the “Reseller Portal” button written in blue text.

How do I login to My Milestone account?
Logging into My Milestone with a Milestone account
1. Navigate to the milestonesys.com website

2. Click on the “LOG IN” button on the right-hand side of the screen to log into your “My Milestone” account.

3. A dropdown menu appears, click on “My Milestone” to continue.

4. In order to get into your “My Milestone” you first have to enter your Milestone account details. Click on the Username field and enter your Milestone account Username.

5. Click on the Password field and enter your Milestone account password.

6. Click on the “LOG IN” button to continue.

7. To enter your “My Milestone” Portal, select the “Reseller Portal” button written in blue text.

8. Congratulations you have successfully logged into your “My Milestone” Portal.

How do I find my e-Learning exams?
Locating your Milestone Exams within the Milestone eLearning Portal
1. In order to locate your Milestone Courses you will first have to sign into your Milestone account.

2. Once you have signed into your Milestone account, hover over the “Support” option and select the “Milestone Learning” button found beneath the “Self-Service & Support” section.

3. Milestone will redirect you to the “Milestone Learning” page. Click on the “Log In” button in the upper-right corner of the screen to continue.

4. Milestone will automatically redirect you if you were already signed in. Click on the “Certifications” button to continue.

5. Here you will find your Milestone assessments as well as the certificates for those assessments. Click on the “Milestone Certified Integration Technician (MCIT) Assessment”.

6. Click on the “Launch” button to begin your assessment. Congratulations you have successfully located your MCIT Assessment.

How do I find my e-Learning certificates?
Locating your Milestone Certificates within the Milestone eLearning Portal
1. In order to locate your Milestone Certificates you will first have to sign into your Milestone account.

2. Once you have signed into your Milestone account, hover over the “Support” option and select the “Milestone Learning” button found beneath the “Self-Service& Support” section.

3. Milestone will redirect you to the “Milestone Learning” page. Click on the “Log In” button in the upper-right corner of the screen to continue.

4. Milestone will automatically redirect you if you were already signed in. Click on the “Certifications” button to continue.

5. Here you will find you Milestone assessments as well as the certificates for those assessments. Click on the “Milestone Certified Integration Technician (MCIT)Assessment”.

6. Locate and click on the “Download Certificates” button to continue.

7. Click on the blue link provided to download your Exam Certificate.

How do I find the Milestone Server Calculator?
Milestone Server Calculator
1. Navigate to https://www.milestonesys.com/
2. Click this icon.

3. Click “My Milestone”
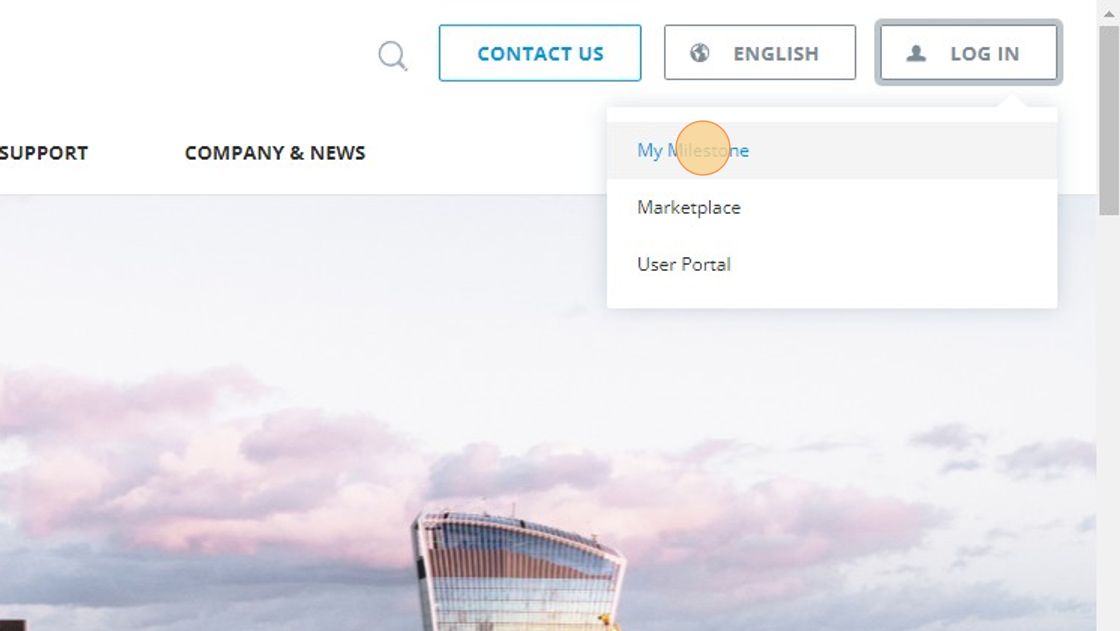
4. Click “LOG IN”
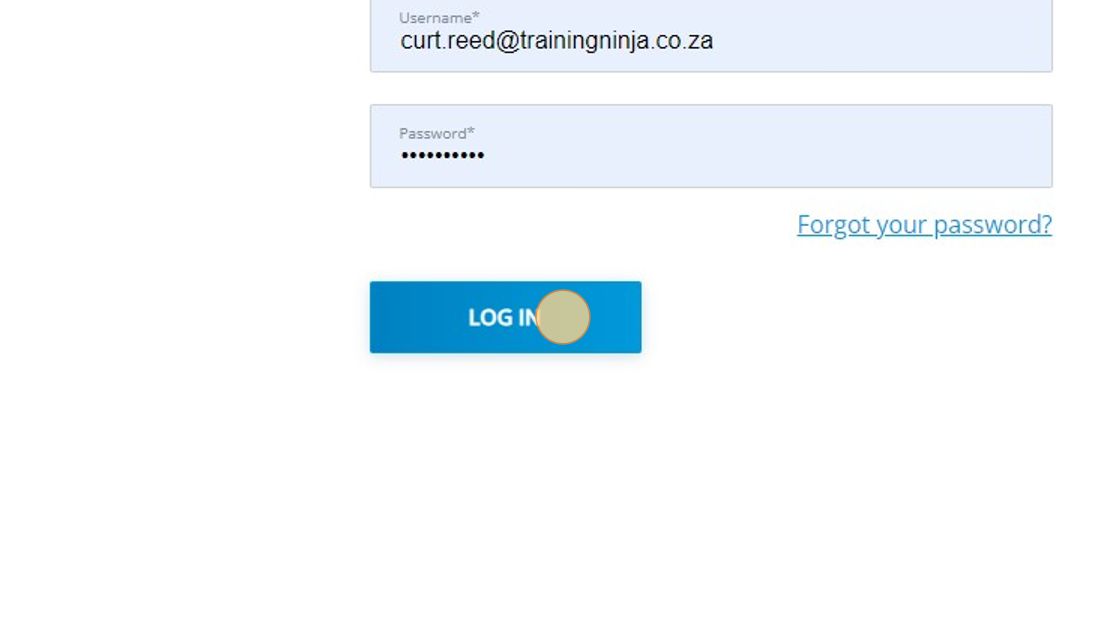
5. Click this image.

6. Scroll down, locate and click on the “XProtect Server Calculator”
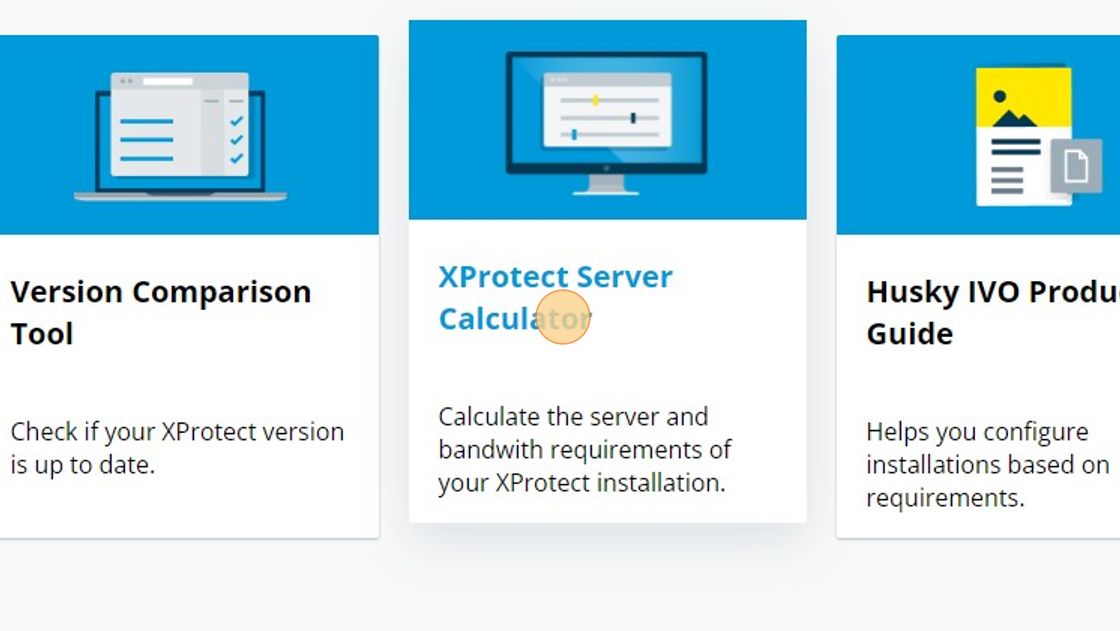
7. Congratulations you have successfully located the “XProtect Server Calculator”
8.

How do I find the Milestone Husky Server Calculator?
Locating the Milestone Husky Server Calculator
1. Navigate to https://www.milestonesys.com/
2. Click “LOG IN”

3. Click “My Milestone”

Tip! Enter your My Milestone access credentials!
4. Click “LOG IN”

5. Click on the Milestone Reseller Portal Option.

Tip! Scroll Down
6. Locate and click on the “Husky IVO Product Guide”
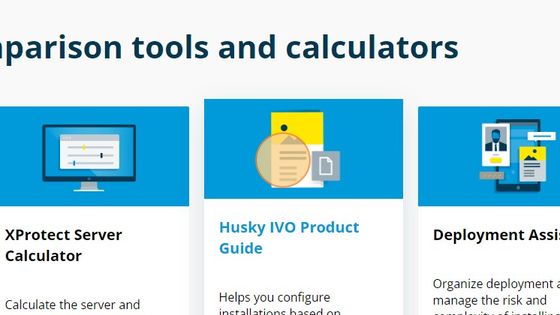
7. Congratulations! You have located the XProtect Server Calculator.
How do I activate my XProtect license offline?
Importing and Activating a license using the Offline method
1. Locate and double-click on the Management Client icon on the Desktop.

2. Enter your login details and click on the “Sign in” button to sign into the Management Client.

3. Locate and click on the “License Information” node in the Site Navigation area.

4. All systems are required to be activated. Cameras that are added to the system but not yet activated fall into a grace period, each grace period lasts 30 days. Avoid grace periods by activating your license.

5. In the event the Management server does not have internet access follow the manual activation procedure.

6. Click on the “Offline”‘ method.

7. Export the .lrq license to a location on the workstation.

8. Choose any location to export the license but for the purposes of this course we will export the .lrq license to the desktop.

9. Click on the save button to confirm the location of the .lrq license, in order to activate a .lrq license the .lrq license needs to be transferred to a machine with internet access.

10. Once the .lrq license has been transferred to a PC with an internet connection, open a browser and navigate to the milestonesys.com website.

11. Once you have navigated to the milestonesys.com website, click on the “LOG IN” button.

12. Click on “My Milestone” to continue.

13. Click on the “Username” field and enter your Milestone account username.

14. Click on the “Password” field and enter your Milestone account password.

15. Click on the “LOG IN” button to sign into your Milestone account.

16. Once you have signed into your “My Milestone” account, locate and click on the “Reseller Portal” option to continue.

17. Click on the “Customer Dashboard” option to proceed.

18. Click on the “Continue” button to be redirected to the Customer Dashboard page.

19. Once you have been redirected to the Customer Dashboard page, click on the “Licenses” option on the left-hand side of the screen.

20. Click on the “Activate .lrq file” button to activate your imported license.

21. Click on the “Select .lrq file” button and locate the .lrq license on the PC.

22. Click on the .lrq license.

23. Click on the “Open” button to confirm the selected license.

24. You may also include additional recipients that you want the license to be emailed to.

25. Click on the “Add” button to ensure that other recipients get emailed the license.

26. Click on the “Upload” button to complete the activation process of the license.

27. You and all the recipients who were added will receive and email with the activated license. Log back into your original workstation to continue.

28. Ensure that the activated .lic license is transferred back to the Management server in order to complete the offline activation method.

29. Open the Management Client and click on the “License Information” node in the Site Navigation area.

30. Click on the “Activate License Manually” button.

31. Select the “Offline” method.

32. Click on the “Import Activated License” option to continue.

33. Locate and click the .lic license.

34. Click on the “Open” button to confirm the selected license and complete the Offline Activation method.

35. Congratulations you have successfully activated your license using the offline activation method. Activated devices will now be displayed in the activated devices area.

How do I install a Device Pack?
Downloading and Installing a XProtect Device Pack
1. On a new tab enter milestonesys.com in the URL.

2. Once you have been redirected to the Milestone webpage, locate and click on the “Support” header.

3. Click on the “Download Software” option.

4. Click on the dropdown arrow beneath the “Type” section.

5. Select the “Device Packs”‘ option to continue.

6. Click on the dropdown arrow beneath the “Product” section to select which product’s device pack you wish to install.

7. Select one of the Milestone Products in the dropdown which matches your systems Product. For the purposes of this Training Manual we will select “XProtect Corporate”.

8. Click on the “Filter” button to allow Milestone to search for Device Packs matching your description.

9. Once the filtering process has completed, Milestone will display Device Packs based on what the user is searching for. Click on the “XProtect Device Pack” from the list of Device Packs.

10. Your Device pack will automatically begin downloading, once the download is complete locate and click on the three dots in the upper right-hand corner of the screen.

11. Click on the “Downloads” option to view your most recent downloads.

12. Before we begin any installations regarding device packs, first you need to shut down your Recording Server. Right-click on the Recording Server system tray icon.

13. Click on the “Stop Recording Server Service” option to shut down the Recording Server.

14. Verify that the Recording Server has shut down which is indicated with a red square.

15. In your downloads, locate and click on the “MilestoneXProtectVMSDriverInstaller” to begin the installation process.

16. Click on the “Minimize” button on the top right-hand side of your screen to minimize your browser.

17. An installation pop-up will appear, click on the “Run” button to run the installation.

18. In the “Choose Language” section, select your first language. For the purposes of this course I will continue with English.

19. Click on the “Continue” button once you have selected your Language of choice.

20. Click on the “I accept the terms in the license agreement” checkbox to continue.

21. Click on the “Continue” button to proceed.

22. You may specify a file path for your device pack but for the purposes of this Training manual it will be left as it’s default file path. Click on the “Install” button to begin the installation.

23. The Device Pack will begin installing on your workstation.

24. Once the installation is complete you may click on the “Close” button to close the installation pop-up.

25. Now that the installation is complete you have to restart your recording server. Right-click on the Recording Server system tray icon.

26. Select the “Start Recording Server Service” option to start your Recording Server.

27. Congratulations you have successfully installed a Device Pack for your Milestone Product. Verify that your Recording Server has started which is indicated with a green triangle.

How do I install the Legacy Device pack?
Downloading and installing a Legacy Device Pack
1. On a new tab enter milestonesys.com in the URL.

2. Once you have been redirected to the Milestone webpage, locate and click on the “Support” header.

3. Click on the “Download Software” option.

4. Click on the dropdown arrow beneath the “Type” section.

5. Select the “Device Packs”‘ option to continue.

6. Click on the dropdown arrow beneath the “Product” section to select which product’s device pack you wish to install.

7. Select one of the Milestone Products in the dropdown which matches your systems Product. For the purposes of this Training Manual we will select “XProtect Corporate”.

8. Click on the “Filter” button to allow Milestone to search for Device Packs matching your description.

9. Once the filtering process has completed, Milestone will display Device Packs based on what the user is searching for. Click on the “Legacy Device Pack” from the list of Device Packs.

10. Your Device pack will automatically begin downloading, once the download is complete locate and click on the three dots in the upper right-hand corner of the screen.

11. Click on the “Downloads” option to view your most recent downloads.

12. Before we begin any installations regarding device packs, first you need to shut down your Recording Server. Right-click on the Recording Server system tray icon.

13. Click on the “Stop Recording Server Service” option to shut down the Recording Server.

14. Verify that the Recording Server has shut down which is indicated with a red square.

15. In your downloads, locate and click on the “MilestoneXProtectVMSLegacyDriverInstaller” to begin the installation process.

16. Click on the “Minimize” button on the top right-hand side of your screen to minimize your browser.

17. An installation pop-up will appear, click on the “Run” button to run the installation.

18. In the “Choose Language” section, select your first language. For the purposes of this course I will continue with English.

19. Click on the “Continue” button once you have selected your Language of choice.

20. Click on the “I accept the terms in the license agreement” checkbox to continue.

21. Click on the “Continue” button to proceed.

22. You are unable to specify a file path for your Legacy Driver device pack by default. Click on the “Install” button to begin the installation.

23. The Legacy Driver Device Pack will begin installing on your workstation.

24. Once the installation is complete you may click on the “Close” button to close the installation pop-up.

25. Now that the installation is complete you have to restart your recording server. Right-click on the Recording Server system tray icon.

26. Select the “Start Recording Server Service” option to start your Recording Server.

27. Congratulations you have successfully installed a Legacy Driver Device Pack for your Milestone Product. Verify that your Recording Server has started which is indicated with a green triangle.

How do I add View/Groups/Cameras to the XProtect Smart Client?
Adding Views/Groups/ Cameras to the Smart Client
1. Locate the Smart Client icon on the desktop and double-click it to open the Client.

2. Enter your login details and click “Connect” to sign into the Smart Client.

3. In order to add camera views to the Smart Client locate and click on the “Setup” button.

4. View groups need to be created before camera views, select and highlight one of the default folders in the Smart Client navigation area.

5. With the relevant folder highlighted, click on the create “New new group” button.

6. In the text area input a name for the newly created group.

7. Congratulations you have created your first view group. With the newly created group highlighted, click on the “Create new view” button to add a camera view.

8. A list of different aspect ratio’s appear, select an aspect ratio best suited for your workstation.

9. Once you have chosen your aspect ratio you have to select a view type depending on how many cameras you want to have visible inside the view.

10. Enter a name for your newly created view.

11. Once your view has been named you can now add your cameras to that view, use the scroll bar to scroll down to your server.

12. Expand the system overview navigation bar and click on the dropdown arrow next to your server name.

13. Click on the dropdown arrow next to a camera group to view the cameras associated with that group.

14. In order to add cameras to the newly created view. Click and drag each camera to various locations in your view.

15. Once you are happy with the fully populated view, click on the setup button to exit setup mode which will save your changes. The newly created camera view should now be visible.

How do I add cameras to the XProtect Management Client?
Adding cameras to the MGMT Client
1. Locate the Management Client icon on the desktop and double-click it to open the client.

2. Enter your login details and click the “Sign in” button to sign into the Client.

3. Once the Management Client is open, locate and click on the “Recording Servers” node in the site navigation area.

4. Expand the “Recording Servers” node and right-click on the recording server name to continue.

5. A pop-up window appears click on the “Add Hardware” option.

6. In the Add Hardware pop-up select the “Manual” option.

7. Click on the “Next” button to continue.

8. Ensure that you add your CCTV camera hardware credentials before you proceed.

9. Enter your CCTV camera hardware User name.

10. Enter your CCTV device hardware password.

11. Click on the “Next” button to continue.

12. Locate and click on the “Clear All” button to continue.

13. Locate and click on the checkboxes of the camera brands you want to add to your system.

14. Click on the “Next” button to continue.

15. Double-click on the “Address” field and input the IP addresses of each camera you want to add to the Milestone system.

16. With the camera devices added, click on the “Next” button to continue.

17. Milestone will begin scanning the network for the IP addresses of the cameras you want to add. Once the scanning has completed and the cameras are successfully detected, click on the “Next” button to continue.

18. Milestone will begin the process of adding the cameras to your system. Once successfully completed, click on the “Next” button to continue.

19. On the cameras properties page use the checkboxes to add the relevant Streams, Inputs, Outputs, Speakers, and Metadata to the Milestone system.

20. Click on the “Folder” icon to open the camera groups.

21. Click on the “Add Group” button to add a camera group.

22. Enter a name for the new camera group and click the “OK” button to continue.

23. Click on the dropdown arrow beside “Default Group” to select your newly created camera group.

24. Click on “Select Group” to continue.

25. Select the new camera group you had created to add your camera to that group.

26. Click on the “OK” button to close the camera group pop-up.

27. Click on the “Finish” button to complete the process of adding your cameras to Milestone.

28. Once the process has been completed locate and click on the expand button of your newly added camera.

29. Click on the newly added device to see the cameras view in the preview pane.

30. Verify that the newly added camera is functioning.
